How to Set Up a Slip Bobber for Trout
Have you ever been out on one of Arizona's beautiful trout waters, struggling with a traditional fixed bobber that just won't let your bait get down to where the fish are hiding? It’s frustrating, right? That feeling of knowing the trout are deeper, but your rig is holding you back. Well, get ready to leave those struggles behind, because this guide is all about mastering the slip bobber rig, a truly game-changing technique for consistently catching trout in Arizona's diverse fisheries.
Why a Slip Bobber is a Game Changer for Trout Anglers
For many anglers, especially those just getting into the sport, a fixed bobber is the first piece of gear they learn to use. It's simple, straightforward, and for shallow water applications, it works perfectly fine. However, Arizona's trout often prefer deeper, cooler water, or they might be suspended at various depths that a fixed bobber simply can't reach effectively. That's where the slip bobber comes into its own, offering versatility that traditional setups just can't match.
The Limitations of Fixed Bobbers
Imagine you're casting into a deeper section of a lake, perhaps at Show Low Lake or Big Lake, where trout are known to hang out in the cooler thermocline during warmer months, or deeper near structure in winter. With a fixed bobber, your bait is limited to the distance between the bobber and the hook. If that's only a couple of feet, and the fish are twenty feet down, you're essentially just casting in hopes a curious trout will rise all the way up.
Beyond depth, fixed bobbers can be a real pain to cast. If you try to set your fixed bobber rig for a deeper presentation, say six or seven feet, you end up with a long, unwieldy leader dangling from your rod tip. This makes casting accurately, especially with lighter trout tackle, incredibly difficult and often results in frustrating tangles. You spend more time untangling line than actually fishing, and that's no fun for anyone, let alone for a beginner trying to learn Arizona Fishing Rules for Beginners.
The Freedom of a Slip Bobber
The beauty of a slip bobber lies in its name: it "slips" freely along your main line. This seemingly small detail unlocks a world of possibilities for trout anglers. Instead of being constrained to a fixed depth, you can easily adjust your bait to any depth you desire, from just a few inches below the surface to twenty feet down, or even more. This makes it ideal for targeting trout that are cruising at specific depths, whether they're actively feeding near the bottom or suspended in the water column. This adaptability is particularly useful when you're exploring Best Trout Fishing Spots in Arizona, as conditions and fish behavior can vary wildly from one location to another, or even hour to hour.
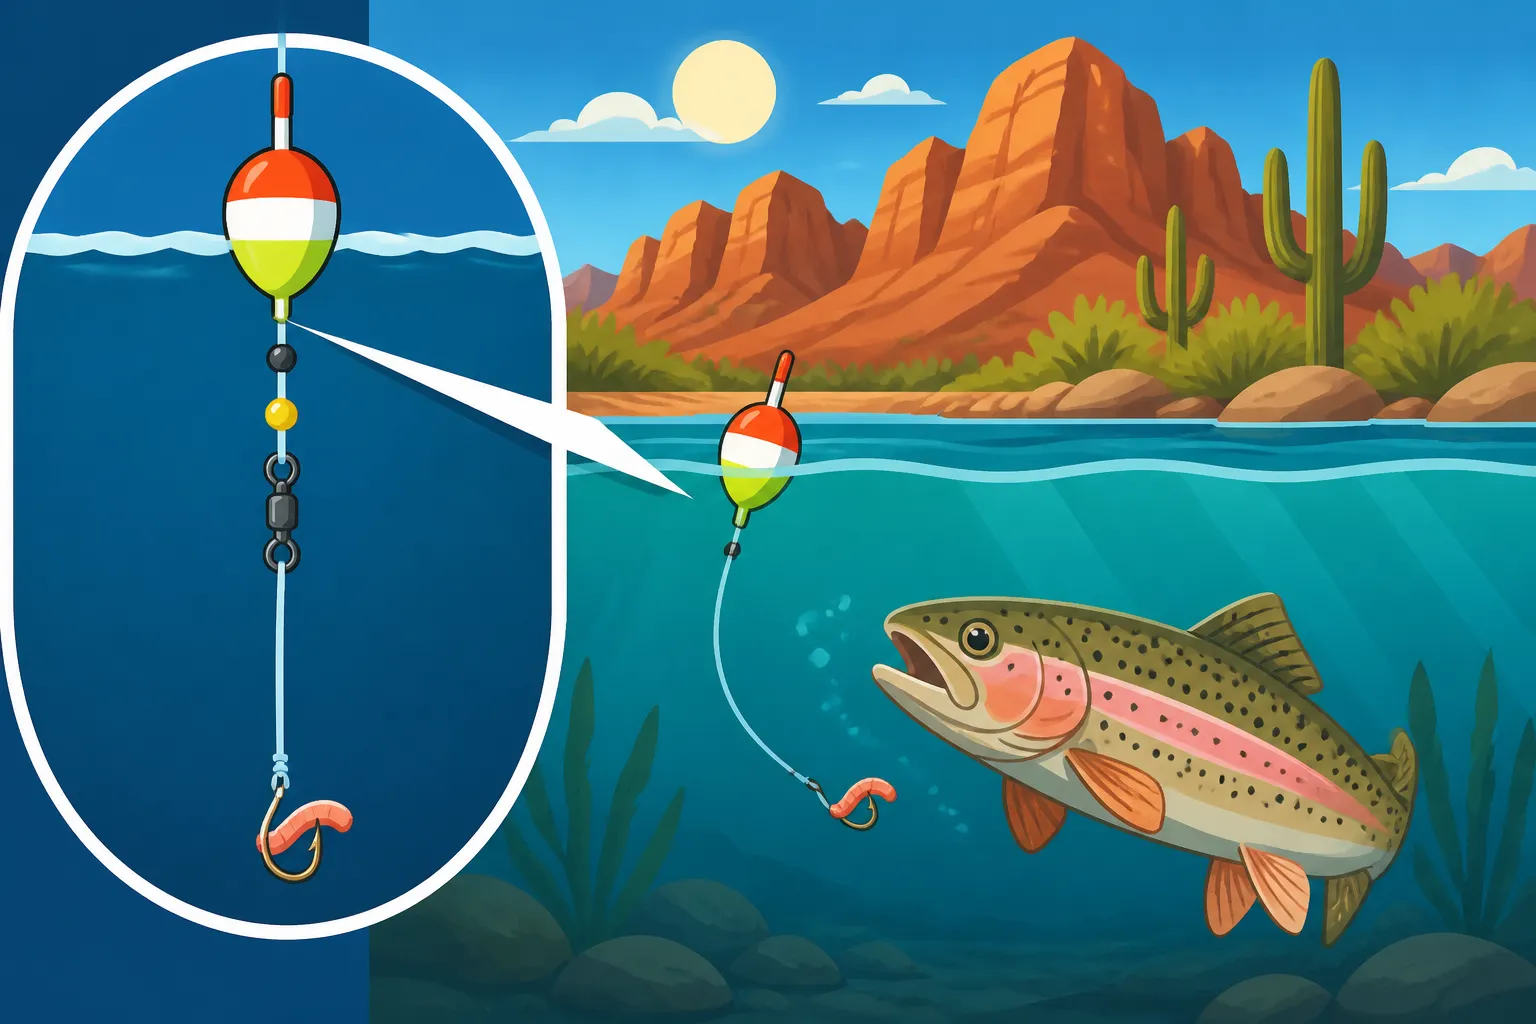
When it comes to casting, the slip bobber truly shines. Because the bobber isn't fixed, you can reel it all the way down to your sinker, effectively shortening your rig to a manageable length for casting. This eliminates those annoying long leaders and allows for much smoother, more accurate casts. Once your cast is made, the weight of your sinker pulls your line through the bobber until it hits a small "bobber stop" that you've set at your desired depth. It's an elegant solution that takes the frustration out of deep-water presentations and makes fishing more enjoyable, allowing you to focus on the catch, not the cast.
Essential Components of a Slip Bobber Rig
To successfully set up a slip bobber rig for trout, you'll need a few specific components that work together to create this versatile system. While many of these items can be found at local tackle shops, online retailers like Amazon also offer a wide selection, often in convenient kits that are perfect for beginners. Knowing what each piece does and how to choose the right one will make all the difference in your trout fishing success.
The Bobber Stop
This tiny, yet crucial, component is what makes the slip bobber system work. The bobber stop dictates the depth at which your bait will suspend. Without it, your bobber would simply slide all the way down to your hook.
There are primarily two types of bobber stops:
- Knot Stops: These are usually small pieces of string tied onto your main line, often pre-tied onto a small plastic sleeve that helps you slide them onto your line easily. They are adjustable, allowing you to slide them up or down your line to change your fishing depth. Once tightened, they hold securely but can be repositioned. Many anglers prefer knot stops because they are very compact and pass easily through rod guides, which is great for long casts. You can learn more about finding the right depth for different trout species in our Rainbow Trout Fishing Guide for Arizona.
- Rubber Stops: These are small, soft rubber pieces that slide onto your line. They are generally quicker to put on and adjust than knot stops but can sometimes be a bit bulkier and might catch on smaller rod guides if you're using a very light rod. They are very popular for their ease of use, especially for those who like to frequently change their fishing depth or are fishing waters like the community ponds where depths can vary.
No matter which type you choose, the key is that it's small enough to pass through your rod guides easily but large enough to stop the bobber from sliding past it.
The Slip Bobber Itself
The actual bobber component is where you'll see a lot of variety, and choosing the right one can make a difference in how well you detect subtle trout bites. Unlike fixed bobbers, slip bobbers are designed with a small hole or sleeve running through their center, allowing your fishing line to pass freely.
Here are some common styles:
- Oval or Round Slip Bobbers: These are probably the most common. They offer good buoyancy and are visible from a distance. They work well in most conditions, from calm lakes to light currents.
- Pencil or Stick Slip Bobbers: These are long and slender. They stand upright in the water and offer less resistance to a biting fish, making them excellent for detecting very subtle bites from finicky trout. They are often a top choice for targeting Rainbow Trout Fishing Guide for Arizona as trout can sometimes be very gentle nibblers. However, they can be harder to see in choppy water.
- Weighted Slip Bobbers: Some slip bobbers come with a small weight built into their bottom. This helps them cast further and stand upright more quickly in the water. They are great for windy conditions or when you need to make a longer cast to reach a distant school of fish. Just remember to account for the bobber's weight when adding split shot to avoid over-weighting your rig.
Choosing the right size is also important. A good rule of thumb is to use the smallest bobber that can still adequately support your bait and sinker while remaining visible. A smaller bobber provides less resistance, meaning a trout is less likely to feel the drag and spit out the bait.
Weights, Hooks, and Swivels
These are the business end of your slip bobber rig, and selecting the right ones is crucial for effective trout fishing.
- Weights: For trout fishing with a slip bobber, you'll generally use small split shot or a sliding sinker. Split shot are small, lead (or lead-free) weights that you crimp onto your line. They are excellent for fine-tuning the balance of your bobber. A few small split shot spaced a few inches above your hook can help your bait present more naturally. Alternatively, a single, small sliding egg sinker or bullet weight can be used. This type of weight slides freely on your line, and when a fish bites, it feels less resistance, only pulling the bobber, not the weight. If you use a sliding sinker, you'll want to place a small split shot below it to prevent it from sliding all the way down to your hook.
- Pro Tip: Your goal is to use just enough weight to get your bait down and make your bobber stand upright, with only a small portion showing above the water. This maximizes sensitivity.
- Hooks: For trout, small, sharp hooks are key. Sizes typically range from size 8 to size 14, depending on the size of the trout you're targeting and the bait you're using. Bait-holder hooks (with small barbs on the shank to hold bait) or small treble hooks (often used with dough baits like PowerBait) are common choices. Consider using treble hooks when fishing with molded baits, or single salmon egg hooks for natural baits.
- Swivels: While not strictly mandatory for every slip bobber rig, a small barrel swivel or crane swivel can be incredibly helpful. It serves two main purposes:
- Line Twist Prevention: If you're using spinning baits or fishing in current, a swivel prevents your line from twisting, which can weaken it and cause tangles.
- Leader Connection: It provides a convenient point to attach a lighter fluorocarbon or monofilament leader (often 12-24 inches long) to your main line. A lighter leader can make your presentation more stealthy, especially in clear Arizona waters, and protect your main line from abrasive rocks or fish teeth.
Step-by-Step Guide to Setting Up Your Slip Bobber Rig
Alright, let's get down to the nitty-gritty and walk through how to assemble this fantastic setup. Don't worry, it's easier than it sounds, and once you do it a couple of times, it'll be second nature. This rig is particularly effective when you're trying to fish deeper structures or when trout are being finicky, a common scenario in many Best Fishing Lakes in Arizona.
Attaching the Bobber Stop
This is the very first step, and it's critical. The bobber stop needs to go on your main line before anything else.
- For Knot Stops:
- Most knot stops come pre-threaded on a small plastic sleeve. Simply thread your main fishing line through the loop of the plastic sleeve.
- Slide the knot stop off the sleeve and onto your main line. The sleeve acts as a guide.
- Once the knot is on your main line, gently pull the tag ends of the knot to tighten it just enough so it holds its position but can still be slid up and down with a little effort. You don't want to cinch it down so tight that it damages your line, but it needs to resist the bobber.
- Trim the excess tag ends of the knot, leaving about a quarter-inch on each side to ensure it doesn't unravel.
- For Rubber Stops:
- Rubber stops usually come on a small wire loop. Pass your main fishing line through this wire loop.
- Slide the rubber stop off the wire loop and onto your main line.
- The rubber stop will have a snug fit. You can slide it up and down your line to adjust depth, but it will stay put under pressure from the bobber.
Remember, the bobber stop will be the highest point of your rig on the line, determining your maximum fishing depth.
Threading the Bobber and Adding Weight
With your bobber stop securely on your line, the next steps involve adding the rest of your core components.
- Thread the Slip Bobber: Take your chosen slip bobber. It will have a small hole or a plastic tube running through its center. Thread your main line through this hole or tube, from the top of the bobber to the bottom. The line should pass freely through it.
- Add Your Weight: This is where you'll decide between split shot or a sliding sinker.
- For Split Shot: Crimp one or more small split shot onto your line, a few inches above where you'll tie your hook. The exact amount of weight depends on your bobber's buoyancy and the current, but start with enough to make your bobber sit upright with just the tip exposed. Spacing them out slightly can help with a more natural fall.
- For a Sliding Sinker: If you're using a sliding egg or bullet sinker, thread your main line through it. Then, place a small split shot about 6-12 inches above where your hook will be tied. This small split shot acts as a "stop" for your sliding sinker, preventing it from resting directly on your hook. The idea is that the fish feels less resistance when it bites because it's pulling only the bobber, not the full weight of the sinker.
Make sure your weight is positioned far enough from the bobber that it allows the line to pass through freely, and close enough to your bait to get it down to the desired depth.
Tying on Your Hook/Lure
Now for the final, crucial connection: attaching your hook.
- Attach a Swivel (Optional but Recommended): If you're using a swivel, tie it to the end of your main line using a strong, reliable knot like a Palomar knot or an improved clinch knot. Then, tie a leader (typically 12-24 inches of lighter fluorocarbon or monofilament line) from the other end of the swivel to your hook. This creates a more robust and less visible connection. Using a good swivel is especially helpful when dealing with larger trout in spots like Lees Ferry Arizona Fishing Guide, where long fights can twist lines.
- Tie on Your Hook Directly: If you're skipping the swivel and leader, simply tie your hook directly to the end of your main line using an improved clinch knot or a Palomar knot. For trout, ensure your knots are tied correctly and cinched down well, as their mouths can be soft, and a hook can pull out if not securely tied.
- Add Your Bait: This is the fun part! For trout in Arizona, popular baits include PowerBait (often molded into a ball around a treble hook), corn, mealworms, salmon eggs, or even small worms. Small jigs or spinners can also be effective under a slip bobber, especially if you're working an area where trout are actively chasing baitfish. Understanding what Best Baits and Lures for Arizona Fishing are effective can really improve your success.
Fine-Tuning Your Slip Bobber for Arizona Trout
Setting up the rig is just the beginning. The real magic of the slip bobber comes in how you fine-tune it to match the conditions and the trout's behavior. Arizona's waters can vary immensely, from crystal-clear mountain lakes to warmer desert reservoirs, so adaptability is key. This adaptability will ensure your efforts are maximized, whether you're at a high-elevation lake like Big Lake or one of the urban community lakes.
Adjusting Depth for Success
This is perhaps the most powerful feature of the slip bobber. Trout are often depth-sensitive, and finding their preferred zone can be the difference between a slow day and a banner day.
- Start with Suspected Depth: If you know the water depth, start by setting your bobber stop so your bait is a few feet off the bottom. If you're fishing a 15-foot deep hole, set your stop at 12-13 feet. Trout will often cruise just above the bottom looking for food.
- Work the Water Column: If you're not getting bites after 15-20 minutes, adjust your bobber stop shallower by a few feet. Repeat this process, gradually moving your bait up the water column. Trout can be suspended at various depths, especially in relation to temperature changes or schools of baitfish. In some cases, especially after fresh stockings during Trout Stocking Season in Arizona, trout might be quite shallow.
- Consider Bottom Fishing: Sometimes, especially with dough baits that float, you might want your bait directly on the bottom. In this case, measure your depth, set your bobber stop a little deeper than the actual depth, and use enough weight to keep your bait submerged. The floating bait will then rise a few inches or a foot off the bottom, presenting perfectly.
- Environmental Cues: Pay attention to your surroundings. Are there any visible insect hatches on the surface? Trout might be feeding higher. Is it a hot day? They'll likely be deeper. Cold day? Sometimes they'll be shallower, warming in the sun.
The beauty is that adjusting depth is as simple as sliding that bobber stop up or down your line. No re-tying, no cutting, just a quick slide and you're back in the game. This makes it a fantastic tool for exploring different depths until you find where the fish are holding, particularly in the ever-changing conditions of Arizona Fishing Seasons Explained.
Matching Bobber Size to Conditions
Just like choosing the right bait, selecting the correct size and style of slip bobber for the conditions is vital.
- Wind and Waves: On windy days or in choppy water, a larger, more buoyant oval or round slip bobber will be much easier to see than a slender pencil bobber. The extra surface area helps it ride the waves without getting lost in the chop.
- Current: If you're fishing in a gentle current, a slightly heavier, perhaps weighted, bobber might help your line stay put without drifting too quickly. Too light a bobber, and it'll get pushed around, making it hard to keep your bait in the strike zone.
- Bait Size: Always use the smallest bobber that can still effectively support your bait and sinker. If your bobber is too large for your bait, it will offer too much resistance to a biting fish, and they'll feel the drag and drop the bait before you can set the hook. A perfectly balanced bobber will stand upright with just its tip visible, making it highly sensitive to even the lightest bites.
Consider the clarity of the water too. In very clear lakes, sometimes a smaller, less obtrusive bobber can be less intimidating to wary trout.
Reading the Bite
This is where the excitement comes in! A slip bobber, when properly weighted, is incredibly sensitive.
- The Dip: The most common sign of a bite is the bobber dipping or disappearing beneath the surface. This usually means a fish has taken the bait and is moving off with it.
- The Slide: Sometimes, especially with lighter bites or larger trout that might mouth the bait, the bobber might simply slide sideways or move erratically without fully submerging. This is still a bite and warrants investigation!
- The Lift: Believe it or not, sometimes a fish will pick up the bait and swim up with it, causing the bobber to lie flat on the surface or even subtly rise. This is a tell-tale sign of an upward-moving fish.
Once you see any of these indicators, don't wait too long. Give it a second or two to ensure the fish has the bait, then give a firm but gentle upward sweep of your rod to set the hook. With trout, especially those in stocked urban waters, the bite can be quick and subtle, so staying vigilant and ready to react is crucial. Practice makes perfect, and soon you'll be able to interpret every little twitch of your bobber. Using a slip bobber in places like Tempe Town Lake, where trout are often actively cruising, can greatly increase your hook-up ratio.
Slip Bobber Comparison Table
| Feature | Traditional Fixed Bobber | Slip Bobber | Ideal Use Case |
|---|---|---|---|
| Depth Control | Fixed at a set depth | Adjustable to any depth | Fixed: Shallow water, visual bite detection. Slip: Deep water, varied depths. |
| Casting Ease | Difficult with long leaders, prone to tangles | Easy casting even with deep settings | Fixed: Short casts, easy-to-reach spots. Slip: Long casts, reaching distant fish. |
| Bite Sensitivity | Moderate, depends on bobber size | High, minimal resistance to fish | Fixed: Aggressive bites, close-range. Slip: Finicky bites, subtle trout. |
| Versatility | Limited to shallower presentations | Highly versatile for all water depths | Fixed: Simple, quick setup for beginners in shallow areas. Slip: Adapts to changing conditions and fish locations. |
| Components | Bobber, weights, hook | Bobber stop, slip bobber, weights, hook (swivel) | Both: Basic fishing. Slip: Requires specific bobber stop and threading. |
The slip bobber rig truly offers an unparalleled advantage for trout anglers in Arizona. By understanding its components and how to effectively set it up and fine-tune it, you'll open up new possibilities for reaching those elusive fish that traditional methods often miss. From the high country lakes to the urban fishing ponds, this technique will serve you well. So, next time you're heading out to chase some trout, grab a few bobber stops and slip bobbers, and give this game-changing rig a try. You might just find your new favorite way to fish!
Disclaimer
This article is for general informational purposes only and does not constitute professional advice. Laws, prices and regulations vary by location and change over time. Consult a qualified professional for guidance on your specific situation.